I know I’ve haven’t written a Blog for awhile and I need to write a few of them for videos I have posted in You Tube, so here I am trying to catch up.
One of the videos I posted earlier was about doing a simple fix on a broken gumpaste flower. I remember years ago I was working at a custom cake store and one flower broke. I was about to throw it away and my good friend Maria told me not to. She said we can use it in the back of the cake and hide the broken part. So I adopted that way of thinking.
For cake shows and competitions this is not something I would suggest doing since judges do thoroughly inspect the arrangements to make sure that all of the flowers are done perfectly. But when you are dealing with weddings, some things are more forgivable and hiding a broken flower by using it as a filler works great, as long as you place it in such a way that the broken piece won’t show .
On a cake I was working on, the flower that broke was one of my favorites. Yes, I do have flowers that turn out better than others and I prefer using them for the front of the cake. A petal from the flower broke off and it was a clean break. When you get a clean break at the base of the petal, it’s a bit easier to fix and can be easier to hide. When done well, no one will notice the break. I do make sure to place the broken area in such a way that it’s less visible.
I remember when I was just starting to decorate cakes, there was a cake decorator who told me he used crazy glue to fix broken flowers. I just don’t feel comfortable using it near anything that goes in my cake. I know that gumpaste flowers are really not for eating but I still have my reservations.
I prefer to soften a small amount of gumpaste with some gum glue (click here for gum glue tutorial), and place it in the broken edge and let it dry. This usually works great but you have to let it dry well before you can use the flower. So if I am in a hurry and I can’t wait, I use a small piece of super thin gumpaste and add it with gum glue. Sometimes putting this super thin layer on one side will give you a strong bond but if you want an even stronger bond, I recommend that you do this on both sides of the petal.
Watch the video tutorial to see how I do it. I hope it helps when one of your flowers gets broken while you’re working on a cake.
I just got 2 new molds and I asked on Instagram which one you guys would prefer to see in a tutorial. I should have known that most of you would say both. LOL. I’ve decided to do both but I started with the rose mold first.
The Rosette Mold comes from a very popular design that creates beautiful roses by using stripes of fondant that are ruffled, and then placed strategically on the cake forming roses. This technique reminds me of the lace fabric I used to work with years ago when I designed clothing. Even though the design is so beautiful, you can expect long amounts of hours working on this design. It’s very time consuming.
I always love anything that shortens the length of work time when I am working on a cake. Not only can the customer save some money but I save time and earn more money too, so for me this is a win win. Now I can give the customer an option and if they want the original design, then they know they have to pay more for the work it involves, or just simply save some money and labor by using this shortcut.
I decided to see how the mold looks in a 2 tier cake and this is the finish product.
I finished the cake with some of my favorite flowers gumpaste Orchids and Roses with some filler flowers and tropical leaves. I have a tutorial on Orchids posted in the website already but soon I will be adding a section with advanced tutorials that you can access anytime and will include more flowers, plus I plan to add more tutorials to it.
And here is a close up of the pattern for the Rosette Mold.
I will do another tutorial as soon as I can using the other mold I got. In the meantime I hope you enjoy this tutorial. I am posting the links to the products below for those of you who ask.
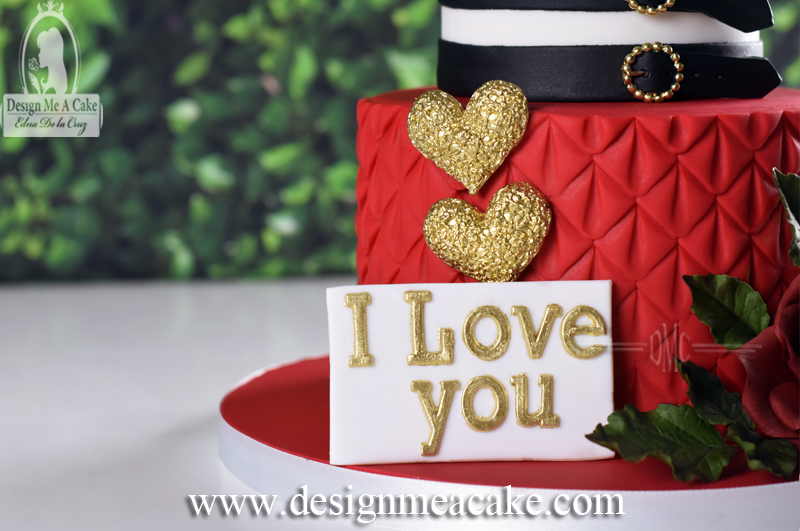
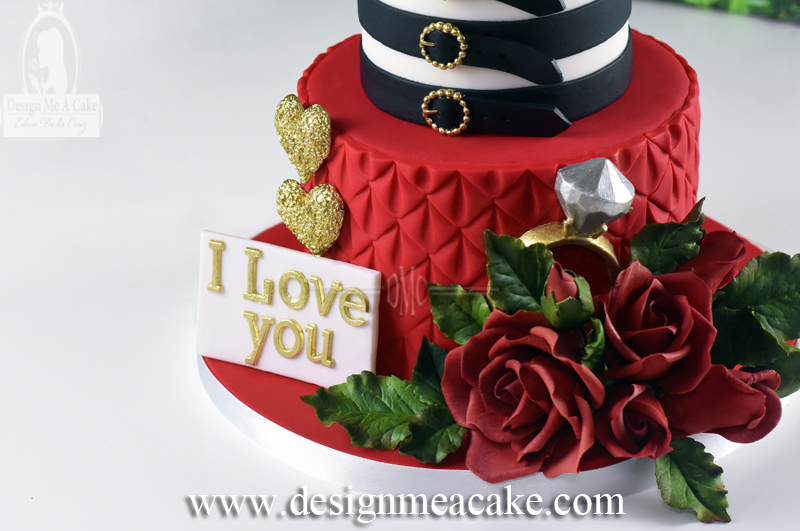
I love everything about this cake. I love the colors, the heart, the envelope, and the concept behind it. Reason why there’s a ring in between the roses is because this was an engagement cake.
The story behind this cake is pretty neat. The “P.S. I love you” comes from the couples favorite movie. I actually love this movie too! The woman in the story (played by Hilary Swank), looses her husband to a devastating illness. The husband knew that his time is coming to an end so for him to show his wife how much he loved her, he took it upon himself and orchestrated a plan to show his true devotion for her even after his death. All of the letters he wrote ended with the “P.S. I love you.”
Even though the story is a bit sad, the movie is really uplifting as throughout his notes he encourages her to move forward in her life, find her passion once again and fall in love all over again. P.S. I love you becomes a really good reminder of not to take anything for granted in life.
The red rose is an unmistakable expression of love in its entirety. There is also a meaning behind the amount of nine roses on the cake. A flower’s meaning is not specific to its colour and type alone, but also, to the number of flowers you choose. Nine is a symbol of eternal love. You would often give this exact number of roses to those you wish to spend the rest of life with.
The heart shape is the universal symbol of romantic love. Hearts symbolizes unity, cohesion adoration, femininity, soul connection, sexuality, courage and so much more. This symbol was already established as a symbol of love in the 19th century, but is most commonly used in this era thru social media. Utilizing emojis that express admiration or adoration for something or someone.
The belt motif relates to a general bond that can be understood as an unbreakable unity and strength. It also means loyalty, forever and love. There are 4 belts in the upper tier. The number four symbolizes the safety and security of the home, the need for stability and a solid foundation of values and beliefs.
The ring is another symbol of love. It’s made in a circle that has no beginning or end and is therefore a symbol of infinity. It is endless, eternal; just the way love should be. Many people think the origin of this custom stems from an ancient Roman belief that a vein travels directly from the left ring finger to the heart. As we already know, the heart is a symbol for true love.
The color black can have good and bad connotations. This one is used to express the meaning of strength, protection, comfort, seductive, formality and elegance. The red means passion, seduction, desire and love.
Not all cakes have a symbol for each motif or item placed on the cake. Most people just do a cake that they find beautiful to their taste or will match their decor, but some people make sure that their emotions come across in the most subtle ways to ensure that their other halves know how they feel.
I filmed a tutorial on this cake and I am posting the links for the materials I used on this cake below( scroll down to check them). Click here to see the tutorialor on the photo below.
I hope you enjoy the tutorial and this Blog. Until next time, ta ta!
Edna 🙂
*Not all products are promoted in this blog; just a few. I do love all the products I used and that’s why I mention them, and earnings are used in making new tutorials. Thanks for the support!
Years ago I was designing a cake for a bride and somehow we came to the conclusion that she wanted to have the topper fully as a dummy so she could save it and use it for her first year anniversary celebration cake. These days I mention this idea to all my brides just so that they know that this is an option available to them to do for their cakes. I love making toppers that I know will be saved and will keep the memory of that special event. It’s a great way to save something from the event and use it with a fresh cake if they want to.
The topper can be saved in a box or even under glass, if you want to save it from getting dusty so you can reuse it. If you prefer, you can display it in your house as long as you protect it from heat and light. The light will make the colors fade and the heat might soften the gumpaste details, so I prefer to keep it in a cold and dry area and away from sunlight or UV lights. With proper care a sugar piece should last for many years.
I still have a topper I made from a class I taught years ago and it’s still in great condition. Of course it won’t last forever, but if you lightly dust it, it should last for a very long time. Having the option of saving a topper is something that brides love. Especially when it comes to using gumpaste flowers. When they have the option of saving the item for a longer period, they feel better about investing on what is ultimately a work of art. I do make sure to tell them to be careful when moving the piece and cleaning it since gumpaste is delicate.
I made a tutorial on how I did the base of this cake. I wanted this base to look like a modern style basket weave, so I decided to use this beautiful mold from Marvelous Molds for my base. The tutorial shows how to use basic molds in unusual cake shapes. I basically divided my cake into panels and added other details to complete and clean the final design. I love the combination of the black and Copper Petal Dustfor this fall theme topper.
Once you achieve your base, you can finish the topper with any flowers you want. You can do this type of base on real cake or on a dummy. I used a 6 inch dummy that had a V shape but I have also made this topper using a 4 inch dummy. This is another way to give height to a cake for a bride that is having a small wedding but wants a taller cake that makes a bolder statement.
I will post the links for the materials used in this cake below for those who are interested in them. Click to watch the tutorial.
I hope you enjoy this tutorial. Until next Blog, ta ta!
Edna 🙂
Here are the links for the products I used: Tri Weave Simpress
Beautiful modern weave pattern made
by Marvelous Molds. They have so many
to choose from.
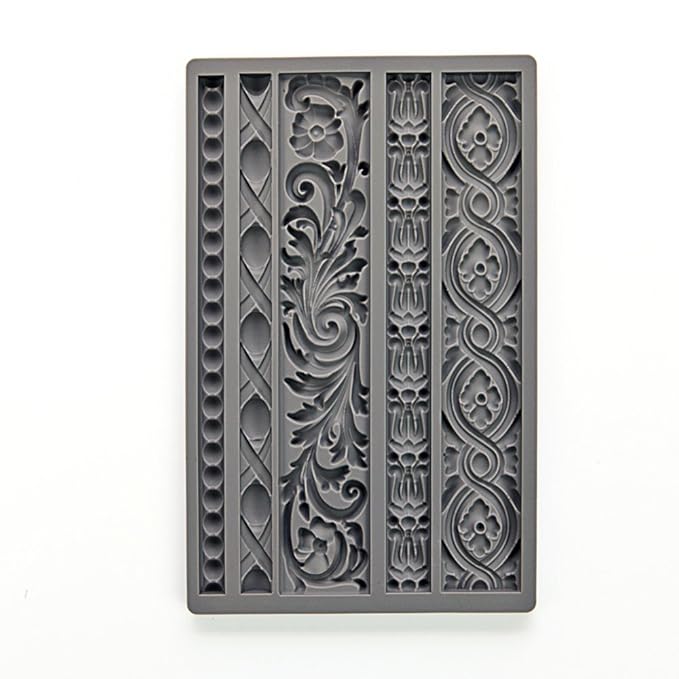
Frame Mold
This is a frame mold from the Celcraft company.
They are called Celshapes. I have used this product for many
I love to knit and crochet and I just got beautiful molds that are just perfect to create a cake that looks like you have knitted a sweater for it. With fall coming, tons of ideas roll in my head on how I can use these molds!
I love molds and I understand that some people don’t like to spend the money on molds because they might be able to do a design without one. For a person that don’t do cakes often and has the time to spend tons of hours on a cake, saving the money seems fair but for those who have many cakes to do in a day, the right mold can make you move faster, so you don’t have to spend so much time making just one cake.
A cake that looks like it has been knitted is one of those designs that can take a lot of time and effort if you do them without a mold. You would have to use an extruder and take 2 strands, twisting them together and then placing it on the cake, one line at a time, so you can cover a whole cake. It will look beautiful, but the hours spent doing that is not something I look forward too. I love making cakes, but I love to enjoy my life too.
Another way to do a knitted look it is by creating your own mold. It’s a fun thing to play with and create your own molds. But let’s face it, getting the materials for this can get expensive and you need to keep in mind that you need to treat the thread so it can be molded properly (Basically you have to buy a product to spray on the knit so it don’t stick to the mold). It can be time-consuming and not necessarily cheaper option, but if you like to play with making your own molds it can be a fun craft.
I like to use many techniques in my cakes. I will never say no to something that will save me time just because someone in the world might think is better to do things this way or that way. If I can make it fast with a mold I will. I also have learned to use the same mold for different purposes to create versatility on the cake by cutting the molds or simply manipulate the pattern to create another design with the same mold. I see them as an investment that will save me time so I don’t have to spend days making a cake that won’t pay me for all that time I spent making it. I say this all the time and I will say it again: “Time is Money” and my free time means I can relax and enjoy life. Something I value very much.
Sometimes I get molds because I use them over and over in my designs. Sometimes I get them because the mold has a unique pattern and sometimes I get them just because they are gorgeous. Whatever the reason I get them for my pleasure and my customers cakes.
You can say it’s one of those addictive habits that I won’t give up easily…lol. Just like my stash of fabrics in my sewing room. I love that it’s there and I can use it at any time I want especially for those last minute outfits you want to create.
For this video I used the Braided Knit Border and theClassic Knit. I think all of them can be used by themselves and make beautiful cakes, but I really wanted to combine them for this cake tutorial.
Marvelous Molds is a great company and constantly creates new and innovated molds that I have yet to encounter to be poorly made. I have used their products since they started making their fabulous molds and they haven’t failed me yet. So my review for this knitted mold in particular is 5 STARS!!! I have worked with many molds throughout the years and a mold with a good design and impression quality of the silicone is very important. I have tested some of the products that are coming from China that are being copied from good companies, but the silicone impressions don’t have the same quality, complete disappointment. It can be a hit or miss with them so I stay with the companies I trust to avoid losing out on money, and save myself from the torture. I have to do a tutorial-review on those products coming from there.
I love the finish look of this cake and I’m so excited to use these molds! Not only for my fall and christmas cakes, but for baby cakes also. Feel free to leave me comments below for products that you want me to review. If it’s accessible to me I can try to add it to my list. Click here to watch the tutorial or click on the photo below.
Until next time, Ta Ta!!!
Edna
*The small earnings from advertisements in this Blog are used towards making more tutorials. Reviews are 100% honest and I stand by them.
Hello to all my cake friends. In two weeks I will be attending the ‘That Take the Cake Show‘ being held at the Round Rock Sports Center in Round Rock, TX., where I will be teaching a 3 hour class with my great friend Karen Vazquez on February 26th, 2016 starting at 5:30 pm. The show itself starts Saturday, February 27th and ends on Sunday the 28th. This show is one of the best cake shows and I finally have the chance to go!
The theme as you can see represents the 17th – 18th century baroque style. Consisting of the dramatic exuberance of colors from today while bringing out the profound ornate elegance of the many fine detailed golden miniature flowers, swirls and pearls. The class will be separated into 2 part class for the 3 hours. Karen will teach the students on how to create the beautiful blend of colors on the cake, and I will teach how to accessorize the cake so it shines!
Gumpaste flowers can be time consuming, so you can imagine how much time it would take to create a dozen miniature flowers using cutters. Luckily for the class, I will educate the students on how to create this beautiful miniature flowers without the use of cutters. This, way I can move faster when decorating the cake and still accomplish that quality that the clients expect from me.
Also, I may mix freehand petals with cutter petals to give the class different approaches so they can choose what works best for them.
The roses can be made completely with no cutters or you can use cutters to finish them; totally based off preference. I will demo 2 kind of blossoms:
Small blossoms are actually the simplest blossoms to create. These flowers are great fillers for gumpaste flower arrangements.
Bigger blossoms have more delicate petals needing just a few more steps to complete them.
Once you know how to make this flowers, you can make beautiful arrangements with them like the swag in the photo above.
Since the class is a 3 hour class, we won’t be able to do a 4 tier cake, so we will have to make a one tier cake that includes the main parts of the design. Because of the limited time, this means that we will only be able to teach you how to paint the cake, create the oval frame, do a couple mini roses along with the leaves. This way, I can demo the rest of the details in the cake for the class so that everyone can see the outcome on how to create this gorgeous creation.
If we have time, I will also include a free demo a full size rose. With what you learn on the class you will be able to do the 4 tier cake shown above, on your time in case we run out of time here. One must not take haste when creating art, for it expresses the true identity and intent of the artist themselves.
If you are interested in the class, click here.
‘That Takes the Cake Show’ is one of the best shows in the country.
If you are interested in participating in the cake competition, take classes or simply just go to visit the show, go to: That Takes The Cake website.
I was surfing the net awhile ago and saw a beautiful cupcake made by The Pastry Studio. I contacted them to use their cupcake as inspiration for
a tutorial and they said yes!
This is the photo that I found. I love how they mix the
pearls and nonpareils. Makes it look really delicate
and elegant.
I don’t know the steps they used in making these
cupcakes, so I will show you how I would make
them. I didn’t have different sizes of pearls so
I used nonpareils, sugar pearls and sugar
crystals. But I do love the bigger pearls they
used in their cupcakes.
For this particular flower you will need 2 five petal cutters. I used the 2 biggest ones on this PME 5 Petal CutterSet.
The flower is not difficult to make. If you are not used to making gumpaste flowers, this is a great way to learn.
When I make cakes, I know I need to move
fast. Spending too much time in a single detail is not a great idea when you are trying to earn some money. This is something I keep in mind when I teach. We want pretty and we want fast.
This is the reason why I mention the tools
I use that help me to move fast when I do tutorials.
I used a Celformer to shape this flower. This is one of those tools that I love and make my flower making a bit easier. I cover them in foil so I can reuse the former as I dry the flowers I already made.
The tutorial is very detailed. You can also
add more detail to the flower with petal dust
if you want to take it to another level. I didn’t
do the petal dust in the tutorial because I wanted to show the simplified version of the flower.
Some people will say this is a lot of work for a cupcake and yes it can be. So make sure to charge well for the work you do. The other option will be to mix this cupcake with others that have a more simple design. The flower can also be used in cakes.
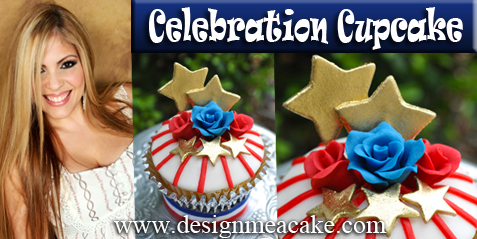
I did this cupcake for the 4th of July and decided to film it while I was working
on it,(click here to watch the video). I love the design on this cupcake. I know many people will say, “that’s too much work for a cupcake”. Yeah, it has some work, and it would be a lot of work if you want to do all your cupcakes with the same design. The beauty about making cupcakes is that you can make them all in different designs. By doing some simple ones, your most complicated ones will shine and make a statement. Here is the cupcake! I used the Strip Cutter to makes the stripes. An easy way to make perfect stripes fast.
I love JEM Cutters. They have a series of cutters that can be place in a foam they created so you can cut your pieces upside down. I love using the cutters this way because you can make sure that the cut is clean.
Here to the right is the cutter I used. You can click on the photo for more info on that tool.
To the left is the Roller Foam. As you can see it works with a lot of the delicate cutters from this company. Click on the photo for more info. I added to the cupcake some stars. As many of you might already know, I love plunger cutters. I move fast when I used them and that’s important when making cakes.
I painted the stars using my favorite gold highlighter.I did a few months ago a video that teaches how to use the Gold highlighter. You can click here to check the tutorial.
I took this photo while I was doing the roses. Miniature roses are fun to make. But it’s important to be able to move fast when doing them. You really don’t want to spend hours making a little tiny flower. I have 2 ways of doing these roses and in the video I just used no cutters. I will do and advanced tutorial on these flowers for those who want to learn to make them.
Every year I do a Christmas cake. It’s a tradition I keep and enjoy. I used to make decorated cookies. But for the past few years I decided to make a cake instead of the cookies. I miss doing the cookies but time will just not allow me to do both.
I decided to do a blog to answer the questions that people ask me when I post a
cake. All the green letters are links to the products.
Here is the naked cake.
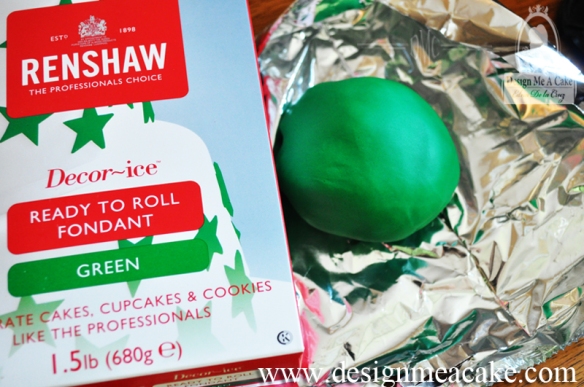
I wanted a Christmas style cake so I definitively wanted green in it.
The fondant I used for the green came from Renshaw. Most of you might
not have heard of them. They are a British company that over 100 years
experience in baking and cake decorating.
I was completely pleased with
this fondant. Often times dark
colors in other brands of fondant
tend to crack, but Renshaw did not crack, the flavor was good and
it was easy to work with.
For the bottom 2 tiers, I used my homemade white fondant. I will post that as soon as I can do a video tutorial on how to make it.
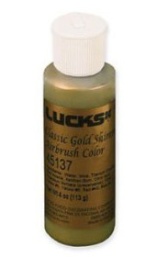
I used Luck’s Classic Gold Shimmer with my Airbrush to color the cake. I love to airbrush a cake but one thing you need to know is that airbrushing will make any small crack look more like a crater. Especially if you try to airbrushed too fast and make the fondant too wet.When it
is too wet it will begin to dissolve the fondant.
I suggest you give it a coat of color and let it dry in between coats to get a better finish. In between drying sessions I keep working with other details of the cake. This way I move faster.
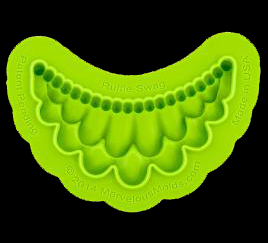
For the bottom tier, I did a band in green. and I cut the top part of the band in the same swag shape I was using on top of it. This is the mold I used called, “The Ruffle Swag”. It’s from the company Marvelous Molds. The mold has two layers of ruffles and is topped with a string of pearls.
I decided to paint those pearls with a Gold Highlighter. (click here for gold).This gold is meant only for decorations that can be taken
down before cutting the cake.
There are lots of highlighter golds out there but none of them are edible. I have seen some companies say it’s approved, but the reality is that none of them are approved. There are other golden tones that are non-toxic but they don’t have the true gold color that the highlighter gives. If you need a true gold for a full cake,
then you can either use edible gold leaf or buy 24 carat luster gold.
This option is a bit more pricey, so I stick with airbrushing.
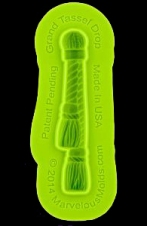
In between the ruffles I added this mold. This one is called, “Grand Tassel Drop Mold”. This one I finished with the highlighter Gold as well.
At the top of each tassel, I added a simple Blossom like the ones I made in my tutorial, “How to make Simple Blossoms”.
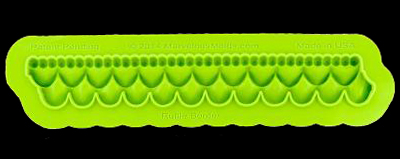
This mold has the same ruffle detail as the swag but it’s on a straight line. The molds connect easily so you can connect them and make them look
like a one big piece. I painted the ruffle part on both the swag and this
one with Super Pearl Luster Dust.
Some people may wonder why I used a mold when I can do bows so easily without the mold. Well, the reason is simple. It’s just a different look and it can be a fast approach too. But basically for me it’s just part of the look I wanted
for the cake.
For the tier that I airbrushed, I added cutouts that look like ornaments.
I don’t have this available at the web store at the moment but if you are
interested in them, feel free to leave me a comment below so I can order some.
They are really easy to work with and I hand painted them with Gold Highlighter.
For this tier, I used thePerfect Pearl Mold
to finish the base. I wanted to bring some of
the white, green and gold to it. This way I
have a color flow between all the tiers.
In the first and last tier, I used anExtruder
to finish the border. I kept those borders
green because I wanted them to blend
with the background.
For the topper I used a Poinsettia. I teach how to make these flowers in my DVD, How to Make Gumpaste Poinsettia”. In the DVD I explain how to make fantasy Poinsettia like this one. I added some gumpaste snowflakes, finished with some disco dust and a cutout Christmas tree dusted in Gold Highlighter.
The Christmas tree cutter is made byXimena (click here for cutter).
On another note, I added a Newsletter button at the top of the blog for those
who want to receive an e-mail newsletter. I don’t like my email to be filled with
daily newsletters and I don’t plan to do that to you guys either. But I can send
news for a new tutorial posted, or a special sale at the store or even a contest.
Plus I plan to do more advanced tutorials too.
I would love for you to share any ideas you may have with me. Do you
guys like basic details on how a cake was done, or do you want
full step by step tutorials? I ask this because I can do basic tutorials
but the ones that are step by step are more time consuming and I
might have to charge a small fee for those. Do you prefer PDF
files or video tutorials?
Any ideas that you have will be great for you to share with me.I want
to do either A video or blog, where I answer questions you have.
So any ideas you have, comments and questions, feel free to
post here or go to my Page in Facebook and post them there.
You are my cake family and I have always tried to help in areas that you
need help. Hopefully with the new year I can finally finish the new website
and not have to stress about it anymore. I want to dedicate more time to
what I truly love, making cakes and teaching. Hope you guys help me with
all this work I have! lol
And don’t worry about misplacing recipes. The new website will have all the
recipes I have and I will add more to the list. Maybe some of the links
will change but all will be there. Even cakes I never posted from my earlier
years.I will leave my old cakes so you can see how much I have
grown through the years. I want people to know that to achieve better
cakes you need time and practice. Giving up is not an option.
Hope you had a wonderful New Year and wish you the best ahead.
Lots of hugs from my house to yours. Thanks for being my cake family!
We have the winners! What an awesome contest. I loved everyone sharing their cakes with me and everyone that visits my Facebook page. So many beautiful cakes!
This is the last day for this contest, and here are the winners.
For the beginners category, the winner is, Daniella Dahl. Love this cake. Makes me want to go to Starbucks to get a coffee. lol
Daniella Dahl
For the advance Category, the winner is Michelle Head. Beautiful cake. Looks like a simple cake, but we know it has a lot of work in it. Very clean design.
Michelle Head
Once again, thanks to everyone that posted a cake and participated in the contest. You are all winners in my heart. I will be doing another one soon.
Subscribe to the blog, I will be trying to post more often. Hopefully we can keep up with it. I am still learning how to use the blog, but we only learn if we keep trying. Just like I say with cake, “The more you do it the easier it gets”.
This is it for today. Congratulations to the winners!!
Until next time, Ta ta!


 was about to throw it away and my good friend Maria told me not to. She said we can use it in the back of the cake and hide the broken part. So I adopted that way of thinking.
 I prefer to soften a small amount of gumpaste with some gum glue (click here for gum glue tutorial), and place it in the broken edge and let it dry. This usually works great but you have to let it dry well before you can use the flower. So if I am in a hurry and I can’t wait, I use a small piece of super thin gumpaste and add it with gum glue. Sometimes putting this super thin layer on one side will give you a strong bond but if you want an even stronger bond, I recommend that you do this on both sides of the petal.


 Frame Mold
 Vintage Art Decor
 Cake Dummy
 Gumpaste Flowers


 sh
sh