What is Goop? Goop is a cake release mix used for pans so that the cake doesn’t stick to it. I am not sure who created thisGoop Recipe but I know is old. I remember years ago working at a custom cake place. The baker had this concoction in a cake pan. She would apply it to the pan and never added flour on top like I used to do when I started baking. That was the way I was taught. You first apply a layer of butter or vegetable shortening and then add a thin layer of flour.
I never liked adding the flour because when the cake was done, I had always some of the powder on the cake and I didn’t like how it tasted. Probably I was adding more than I needed back then but we all learn as we go. I decided eventually to ask what they applied to the pan. That’s the first time I heard about Goop.
Goop has only 3 ingredients and it’s super easy to make. I get lazy sometimes and use spray on my pans but when I am making a lot of cakes, Goop is the only way to go. I always have the ingredients accessible and I can make as much or as little as I need too.
Goop will stay good in a sealed container for around 2 months. I live in a hot and humid area but I always have air conditioner on so if your house is hot, make sure to keep it in a colder area. Oil does get rancid so keep an eye on that. If you smell something funky just throw it and make a fresh batch. If you prefer, you can save it in the fridge. You can use a pastry brush if you have one but if you don’t, use a piece of kitchen paper to spread it around the pan and it should work just fine.
We all want beautiful perfect cakes and even though icing a cake might appear
to be a simple task, it isn’t. Achieving the perfect icing requires practice and once you learn how to do it, it will become easy and fast.
There are many ways to ice a cake. I have tested many of them and most of them work but each person will find one to be their favorite. My favorite way to ice a
cake is by doing a crumb coat. I will eventually talk about other ways of icing a
cake so you guys can choose the one you like best, but I will start with the way
I do it.
A crumb coat is a very thin coat of
icing that is used to seal the crumbs
on the cake. It’s called a crumb coat because you will see the crumbs in
this layer of icing. I use crusting buttercream with my cakes but this technique works with other icings too. One thing to keep in mind is the consistency of the buttercream.
It can’t be too thin because it won’t make it easier for the second coat
to be applied but it can’t be too stiff because it will break the cake. It
needs to be in a good medium consistency.
I do have a system I follow when I ice my cakes. I bake my cakes a few days earlier. I seal them well and place them in the fridge. This will not only help
the flavors to settle down, but you will have a nice cold cake to work with. Many people make the mistake of working on cakes that are too fresh and not
completely cooled down from the baking. Some people can manage working with
a cake in that condition and do an awesome job. But most people will have
a hard time working like that. A fresh baked cake is softer, there will be more
crumbs and the cake will break easily
Now that I have a cold cake, I can torte and fill the cake and get it ready for the
crumb coat. The video I am posting
shows how I do this step. Make sure
your cake is cold. Not only does it make
it easier but it will control the crumbs
and it will help you move faster. If you
are working with stacked cakes, it will be faster to do all the crumb coats and place the cakes in the refrigerator so they cool down and the buttercream hardens. This will make the second coat easier to apply without lifting a lot of the crumb coat.
If you plan to leave the cake with the crumb coat overnight in the fridge, make
sure to cover the cake with some plastic wrap to avoid condensation. if you
get too much condensation on your cake from leaving it overnight, you want to
pat the water away with paper so the second coat doesn’t slide over the first
coat. But keep in mind that it’s better to avoid the condensation than to deal with it. Make sure your refrigerator is not too cold either as it can make condensation worst. There are other ways to avoid condensation but I will do another blog about that.
I talk in the video about the spatula I use when
I ice my cakes. I love my 7 inch angle spatula but keep in mind you might prefer a different one. The bigger the spatula, the more buttercream you can add but it will be heavier
to handle. My other favorite tool would be the scrapper. You want a Scraper that is food
safe and has a nice L-shape that helps control how straight your cake will be. And finally it’s a good idea to have a good turntable. All these things do help to move faster and when you are earning money from making cakes, time is money.
Every year I do a Christmas cake. It’s a tradition I keep and enjoy. I used to make decorated cookies. But for the past few years I decided to make a cake instead of the cookies. I miss doing the cookies but time will just not allow me to do both.
I decided to do a blog to answer the questions that people ask me when I post a
cake. All the green letters are links to the products.
Here is the naked cake.
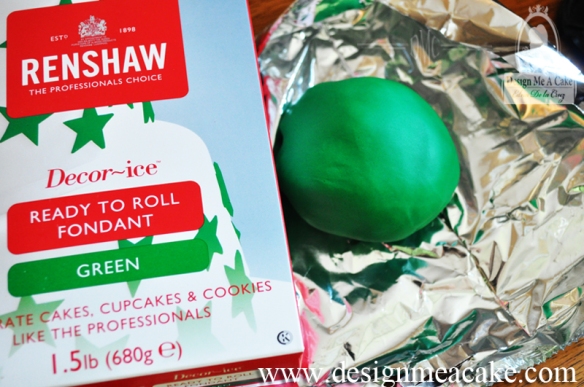
I wanted a Christmas style cake so I definitively wanted green in it.
The fondant I used for the green came from Renshaw. Most of you might
not have heard of them. They are a British company that over 100 years
experience in baking and cake decorating.
I was completely pleased with
this fondant. Often times dark
colors in other brands of fondant
tend to crack, but Renshaw did not crack, the flavor was good and
it was easy to work with.
For the bottom 2 tiers, I used my homemade white fondant. I will post that as soon as I can do a video tutorial on how to make it.
I used Luck’s Classic Gold Shimmer with my Airbrush to color the cake. I love to airbrush a cake but one thing you need to know is that airbrushing will make any small crack look more like a crater. Especially if you try to airbrushed too fast and make the fondant too wet.When it
is too wet it will begin to dissolve the fondant.
I suggest you give it a coat of color and let it dry in between coats to get a better finish. In between drying sessions I keep working with other details of the cake. This way I move faster.
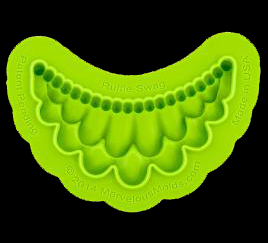
For the bottom tier, I did a band in green. and I cut the top part of the band in the same swag shape I was using on top of it. This is the mold I used called, “The Ruffle Swag”. It’s from the company Marvelous Molds. The mold has two layers of ruffles and is topped with a string of pearls.
I decided to paint those pearls with a Gold Highlighter. (click here for gold).This gold is meant only for decorations that can be taken
down before cutting the cake.
There are lots of highlighter golds out there but none of them are edible. I have seen some companies say it’s approved, but the reality is that none of them are approved. There are other golden tones that are non-toxic but they don’t have the true gold color that the highlighter gives. If you need a true gold for a full cake,
then you can either use edible gold leaf or buy 24 carat luster gold.
This option is a bit more pricey, so I stick with airbrushing.
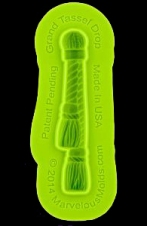
In between the ruffles I added this mold. This one is called, “Grand Tassel Drop Mold”. This one I finished with the highlighter Gold as well.
At the top of each tassel, I added a simple Blossom like the ones I made in my tutorial, “How to make Simple Blossoms”.
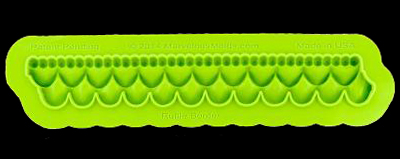
This mold has the same ruffle detail as the swag but it’s on a straight line. The molds connect easily so you can connect them and make them look
like a one big piece. I painted the ruffle part on both the swag and this
one with Super Pearl Luster Dust.
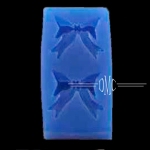
Some people may wonder why I used a mold when I can do bows so easily without the mold. Well, the reason is simple. It’s just a different look and it can be a fast approach too. But basically for me it’s just part of the look I wanted
for the cake.
For the tier that I airbrushed, I added cutouts that look like ornaments.
I don’t have this available at the web store at the moment but if you are
interested in them, feel free to leave me a comment below so I can order some.
They are really easy to work with and I hand painted them with Gold Highlighter.
For this tier, I used thePerfect Pearl Mold
to finish the base. I wanted to bring some of
the white, green and gold to it. This way I
have a color flow between all the tiers.
In the first and last tier, I used anExtruder
to finish the border. I kept those borders
green because I wanted them to blend
with the background.
For the topper I used a Poinsettia. I teach how to make these flowers in my DVD, How to Make Gumpaste Poinsettia”. In the DVD I explain how to make fantasy Poinsettia like this one. I added some gumpaste snowflakes, finished with some disco dust and a cutout Christmas tree dusted in Gold Highlighter.
The Christmas tree cutter is made byXimena (click here for cutter).
On another note, I added a Newsletter button at the top of the blog for those
who want to receive an e-mail newsletter. I don’t like my email to be filled with
daily newsletters and I don’t plan to do that to you guys either. But I can send
news for a new tutorial posted, or a special sale at the store or even a contest.
Plus I plan to do more advanced tutorials too.
I would love for you to share any ideas you may have with me. Do you
guys like basic details on how a cake was done, or do you want
full step by step tutorials? I ask this because I can do basic tutorials
but the ones that are step by step are more time consuming and I
might have to charge a small fee for those. Do you prefer PDF
files or video tutorials?
Any ideas that you have will be great for you to share with me.I want
to do either A video or blog, where I answer questions you have.
So any ideas you have, comments and questions, feel free to
post here or go to my Page in Facebook and post them there.
You are my cake family and I have always tried to help in areas that you
need help. Hopefully with the new year I can finally finish the new website
and not have to stress about it anymore. I want to dedicate more time to
what I truly love, making cakes and teaching. Hope you guys help me with
all this work I have! lol
And don’t worry about misplacing recipes. The new website will have all the
recipes I have and I will add more to the list. Maybe some of the links
will change but all will be there. Even cakes I never posted from my earlier
years.I will leave my old cakes so you can see how much I have
grown through the years. I want people to know that to achieve better
cakes you need time and practice. Giving up is not an option.
Hope you had a wonderful New Year and wish you the best ahead.
Lots of hugs from my house to yours. Thanks for being my cake family!
Here we have the winners for last week by popular vote. Congratulations No Ordinary Cakery and Daniella Dahl!
No Ordinary Cakery-Cabanatuan
Daniella Dahl
We are in the last week of this contest. I need you guys now to vote for your all time favorite cake. We still have 2 categories to choose from, beginners and advanced.
Please make sure to vote for one person of each category.
Here are the 3 advanced winners. Choose your favorite one.
Michelle Head
Beverly Call Brown
No Ordinary Cakery-Cabanatuan
And here are the 3 winners from the past weeks for beginners. Choose your favorite one!
Alis Nonoleta Nuta
Daniella Dahl
Debbie Shaw
Remember to choose one cake for the advanced level, and one for the beginners level. Post the names of your favorite cakes in the comments below. I will announce the winners next week.
I will ask of you guys to not spam the contest with fake votes or business promotions; this is a contest that is for fun. Remember to vote only once, and to list the names of each contestant for each division. Just have fun with it.
Next week I will post the winners of this 4 week contest.
Thanks so much to those who participated in this contest. The winners will win a DVD from my collection, check them out here:
We are reaching the end of this contest. So many beautiful cakes! I wish all of them could win a prize, but I assure you that you guys are all winners in my heart. The love and passion for cake decorating shows.
Here are the winners for this past week contest. Beautiful job!
Michelle Head- advanced
Debbie Shaw-beginner
We now begin voting for this week contest. This is the last week for the contest, but I love when everybody shares their work with me, so please keep sharing! I still need you to come and choose the winner for this week and the winner of the month which will be posted next week. So stick around. 🙂
Scroll down to choose your favorite beginner and advanced cake. Leave a comment below with your favorites for each division.
Here are the names and the cakes chosen for Advanced cakes:
Brenda Oliveira Henkel
María Alejandra Lizárraga
No Ordinary Cakery-Cabanatuan
Here are the names and the cakes chosen for Beginners cakes:
Daniella Dahl
Holly Rhodes
Sandra Van Berkel-García
Remember to choose one cake for the advanced level, and one for the beginners level. Post the names of your favorite cakes in the comments below. I will announce the winners next week.
I will ask of you guys to not spam the contest with fake votes or business promotions; this is a contest that is for fun. Remember to vote only once, and to list the names of each contestant for each division. Just have fun with it.
Next week I will post the winners of this week and then the voting will begin for who is the winner of the month, for both advanced and beginners category.
Thanks so much to those who participated in this contest. I will do another one soon so others can have the chance to win too and show off their beautiful creations to other cake friends.
I need you guys to stick around to help me choose the winners next week too. I will post the reminders in my Facebook Page.
This week I am starting a contest that will run for around 4 weeks. This past weekend was the first week of the contest, and I asked my cake friends to share their cakes in my Facebook Page for Design Me a Cake. I was going to put the names of each contestant in a jar and choose 3 winners each week, but to make it a bit more fair for beginners I’m choosing 2 divisions of 3 winners: Beginners and Advanced. That way beginners won’t feel intimidated by the more advanced cake decorators.
I want to make it clear that there are many beautiful cakes posted in the thread. It’s very difficult to choose just 3 winners for each division. So to make it fair, all the names went into a jar for each division, where both jars will have a lucky draw to declare the winners at the end of the contest.
The next 3 cakes I’m posting below are competing for advanced cakes of this week. Choose one of these as your favorite. Here are the names and the cakes chosen:
Beverly Call Brown
Brenda Oliviera Henkel
Charmaine Magro
The next 3 cakes below are the those chosen from the beginners jar. Choose one of these as your favorite:
Alis Nonoleta Nuta
Laurie Young
Tiona Reed
Remember to choose one cake for the advance cake, and one for the beginners. Post the names of your favorites in the comments below. I will announce the winners next Friday.
In the meantime don’t forget to go post your cakes in the Thread for the contest I posted in my Facebook Page Design Me a Cake.
Remember you can be a winner! The final prize will be a cake toy for each division from my web Store www.designmeacake.biz. You can go check out all the goodies.
I will ask of you guys to not start spamming the contest with fake votes. One vote per person for each division each week. Just have fun with it.
Remember, we still have a few more weeks to play so if you didn’t win this week; keep posting your cakes with your title of beginners or advance level. Good luck to everyone!


 sh
sh