The Best Pans for Baking

Best Baking Pans for baking cakes

I had a question on which cake pans are best for baking and I decided to write a blog about it. Why? Well, the pan you use can make a huge difference in the outcome of your baked goods and when it comes to cake, a cake pan it’s super important. Nobody wants an epic fail after they’ve worked so hard baking a cake.

round cake pan

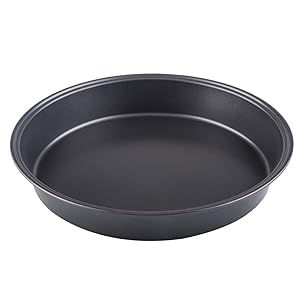
I remember when I started baking cakes. I got myself a pan that looked like this one. The cake turned out dark and the shape was not what I wanted. My cake had the shape of a pie and not a nice tall straight cake.

There are many materials for bakeware out there. You will find metals, glass and silicones are the most commonly used. Metals are my top choice but not all metals are the same. You will find anodized aluminum, silver anodized bakeware, hard-anodized bakeware, aluminum, aluminized steel, and stainless steel. Some of these metals are light-colored and other dark-colored. I will say that the first thing you should look in a cake pan is a light-colored pan. The darker the pan the more browning effect you will get on your cake. I prefer a golden brown color on my cakes but if you prefer a darker color then you can easily go with a darker pan.

I am not gonna go into how metals are made as it will make this blog extremely long. These metals do go through different processes to strengthen them or even for making them rust-proof or even scratch-resistant. If you want to read more about each metal you can go to Tigger Chef Blog (click here), and read more in-depth about the differences between them.

Wilton Performance Pans Aluminum Round Cake Pan, 8-Inch
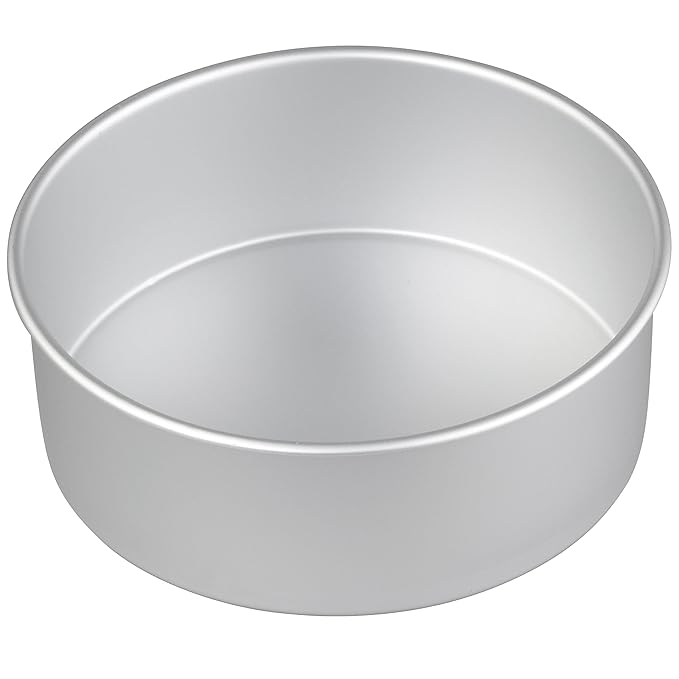
So, which are my favorite cake pans? I have 3 companies I can vouch for. After my first attempt to make a cake on a dark pan that became a failure, I decided to try the Wilton Pans. I bought a 2 x 8 pan, still not knowing much about cake. I found out real fast that one pan of that size is not enough for a cake so I went to get another one. When I was at the store I saw they sold a 3-inch tall pan and I decided to get that one.

Back then I still used a cake box mix. I was really happy to find out that the box mix fit perfectly in the 8 x 3 pan. Back then a standard cake was 4 inches in height and you can achieve that with 2 pans that are 8 x 2, but I like the fact that I can add less cake batter if I want a 4-inch cake or I can go higher if I need a taller cake when I am using the 3-inch pan. Do keep in mind that when choosing taller pans your oven time will have to be increased to bake the cake properly.  In a 2-inch cake pan, you will find that most cakes will be done in around 35 minutes (cooked at 350), but if you use a 3-inch pan that time can be increased to around 45 minutes depending on the cake. I bake my cakes at a lower temperature (325) and it takes over 50 minutes to cook them in the 3-inch pan.

Fat Daddio's Anodized Aluminum Round Cake Pan, 8-Inch x 4-Inch by Fat Daddios

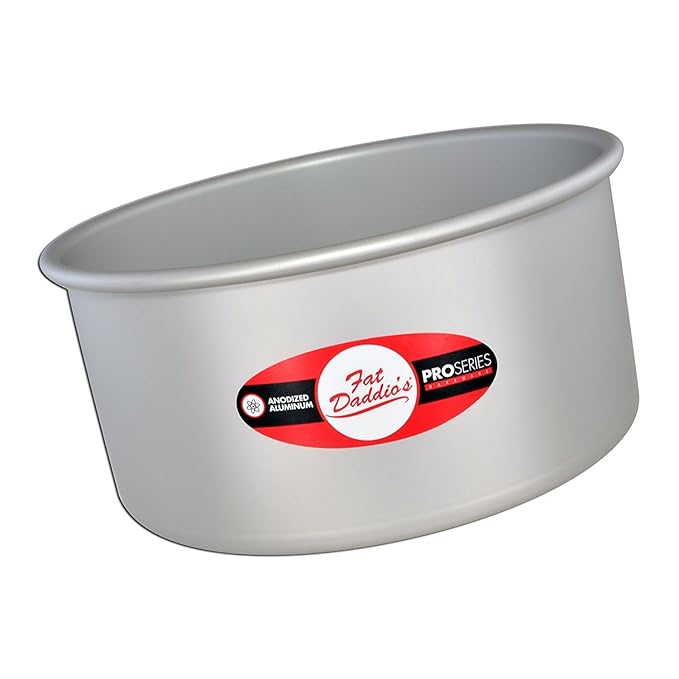
I also love the Pans from Fat Daddios. They are made of anodized aluminum and you will even find a 4-inch tall cake pan in their cake pan selection. Once again, keep in mind that with taller pans you will need to make sure that the batter cooks properly so it doesn’t sink in the center. Sometimes a heating core or the addition of baking strips will help bake these cakes properly.

Parrish Magic Line Square Pan 8" x 8" x 2"


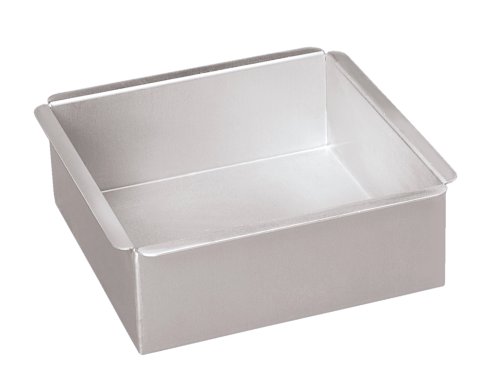
Another company I love is Parrish Magic Line. I must say they have the best shape square pans. Their pans are made of heavy gauge aluminum and have super sharp corners.
These 3 companies use aluminum in their pans. Aluminum heats fast and cools down fast also and that can be important when baking cakes. I don’t use glass for baking because glass takes longer to get hot and takes forever to cool down. Using glass works great for baking things that you want to keep hot for a longer period. The other option you will find out there is silicone. Silicone works well for baking. It’s flexible and can be folded for storage but since they are soft they can be more difficult to work with and they might not last as long as metal pans. You have to be careful with them cracking or puncturing.

I am not getting paid by these companies to mention them. This information is strictly based on my many years of experience with cake pans. I can’t say I have used all companies that are out there selling cake pans but these are the ones I used and fully trust. I am sure that you guys have your own opinions and you are free to share them with me so the cake newbies can choose what to buy.

Hope you enjoy this Blog. Until next time… ta ta!!

Edna 🙂


Fixing a Broken Gumpaste Flower

I know I’ve haven’t written a Blog for awhile and I need to write a few of them for videos I have posted in You Tube, so here I am trying to catch up.

One of the videos I posted earlier was about doing a simple fix on a broken gumpaste flower. I remember years ago I was working at a custom cake store and one flower broke. I was about to throw it away and my good friend Maria told me not to. She said we can use it in the back of the cake and hide the broken part. So I adopted that way of thinking.
For cake shows and competitions this is not something I would suggest doing since judges do thoroughly inspect the arrangements to make sure that all of the flowers are done perfectly. But when you are dealing with weddings, some things are more forgivable and hiding a broken flower by using it as a filler works great, as long as you place it in such a way that the broken piece won’t show .

On a cake I was working on, the flower that broke was one of my favorites. Yes, I do have flowers that turn out better than others and I prefer using them for the front of the cake. A petal from the flower broke off and it was a clean break. When you get a clean break at the base of the petal, it’s a bit easier to fix and can be easier to hide. When done well, no one will notice the break. I do make sure to place the broken area in such a way that it’s less visible.
I remember when I was just starting to decorate cakes, there was a cake decorator who told me he used crazy glue to fix broken flowers. I just don’t feel comfortable using it near anything that goes in my cake. I know that gumpaste flowers are really not for eating but I still have my reservations.

I prefer to soften a small amount of gumpaste with some gum glue (click here for gum glue tutorial), and place it in the broken edge and let it dry. This usually works great but you have to let it dry well before you can use the flower. So if I am in a hurry and I can’t wait, I use a small piece of super thin gumpaste and add it with gum glue. Sometimes putting this super thin layer on one side will give you a strong bond but if you want an even stronger bond, I recommend that you do this on both sides of the petal.

Watch the video tutorial to see how I do it. I hope it helps when one of your flowers gets broken while you’re working on a cake.

Hope you enjoy this tutorial and soon I will post a Blog on the cake I design with them.
Until next Blog, ta ta!

Edna 😉

Rosette Cake Design

I just got 2 new molds and I asked on Instagram which one you guys would prefer to see in a tutorial. I should have known that most of you would say both. LOL. I’ve decided to do both but I started with the rose mold first.

The Rosette Mold comes from a very popular design that creates beautiful roses by using stripes of fondant that are ruffled, and then placed strategically on the cake forming roses. This technique reminds me of the lace fabric I used to work with years ago when I designed clothing. Even though the design is so beautiful, you can expect long amounts of hours working on this design. It’s very time consuming.

I always love anything that shortens the length of work time when I am working on a cake. Not only can the customer save some money but I save time and earn more money too, so for me this is a win win. Now I can give the customer an option and if they want the original design, then they know they have to pay more for the work it involves, or just simply save some money and labor by using this shortcut.

I decided to see how the mold looks in a 2 tier cake and this is the finish product. Rosette Cake Design

I finished the cake with some of my favorite flowers gumpaste Orchids and Roses with some filler flowers and tropical leaves. I have a tutorial on Orchids posted in the website already but soon I will be adding a section with advanced tutorials that you can access anytime and will include more flowers, plus I plan to add more tutorials to it.Gumpaste flower arrangement.

And here is a close up of the pattern for the Rosette Mold.

Easy Rosette Cake Design

I will do another tutorial as soon as I can using the other mold I got. In the meantime I hope you enjoy this tutorial. I am posting the links to the products below for those of you who ask.

You can click here to watch the tutorial!

You can see it in You tube if you prefer. Here’s the link. Don’t forget to Subscribe to my channel!

Until next time.. ta ta!
Edna 🙂


Click here for more info on this beautiful mold.

Engagement Cake Design

I love everything about this cake. I love the colors, the heart, the envelope, and the concept behind it. Reason why there’s a ring in between the roses is because this was an engagement cake.

The story behind this cake is pretty neat. The “P.S. I love you” comes from the couples favorite movie. I actually love this movie too! The woman in the story (played by Hilary Swank), looses her husband to a devastating illness. The husband knew that his time is coming to an end so for him to show his wife how much he loved her, he took it upon himself and orchestrated a plan to show his true devotion for her even after his death. All of the letters he wrote ended with the “P.S. I love you.”

Even though the story is a bit sad, the movie is really uplifting as throughout his notes he encourages her to move forward in her life, find her passion once again and fall in love all over again. P.S. I love you becomes a really good reminder of not to take anything for granted in life.

The red rose is an unmistakable expression of love in its entirety. There is also a meaning behind the amount of nine roses on the cake. A flower’s meaning is not specific to its colour and type alone, but also, to the number of flowers you choose. Nine is a symbol of eternal love. You would often give this exact number of roses to those you wish to spend the rest of life with.

The heart shape is the universal symbol of romantic love. Hearts symbolizes unity, cohesion adoration, femininity, soul connection, sexuality, courage and so much more. This symbol was already established as a symbol of love in the 19th century, but  is most commonly used in this era thru social media. Utilizing emojis that express admiration or adoration for something or someone.

The belt motif relates to a general bond that can be understood as an unbreakable unity and  strength. It also means loyalty, forever and love. There are 4 belts in the upper tier. The number four symbolizes the safety and security of the home, the need for stability and a solid foundation of values and beliefs.

The ring is another symbol of love. It’s made in a circle that has no beginning or end and is therefore a symbol of infinity. It is endless, eternal; just the way love should be. Many people think the origin of this custom stems from an ancient Roman belief that a vein travels directly from the left ring finger to the heart. As we already know, the heart is a symbol for true love.

The color black can have good and bad connotations. This one is used to express the meaning of strength, protection, comfort, seductive, formality and elegance. The red means  passion, seduction, desire and love.

Not all cakes have a symbol for each motif or item placed on the cake. Most people just do a cake that they find beautiful to their taste or will match their decor, but some people make sure that their emotions come across in the most subtle ways to ensure that their other halves know how they feel.

I filmed a tutorial on this cake and I am posting the links for the materials I used on this cake below( scroll down to check them). Click here to see the tutorial or on the photo below.

I hope you enjoy the tutorial and this Blog.
Until next time, ta ta!
Edna 🙂

*Not all products are promoted in this blog; just a few. I do love all the products I used and that’s why I mention them, and earnings are used in making new tutorials. Thanks for the support!

Learn make beautiful Roses


Click here for lettering mold used in this tutorial.

Click here for tutorial on this lettering mold.


Click here for Lavish Loop Mold


Click here for Buckle Mold


Click here for Love Heart Mold

Click here for Filigree Heart Mold

Click here for Gold Highlighter
Click here for Gold Highlighter Tutorial

Gold Highlighter Imperial Gold

Click here for Celebration Envelope Cutter

Celebration Envelope Cutter

Guava Cake Filling


I grew up with a Guava tree in the backyard of our house. It made me a guava lover. This is a very common filling in baking and it’s pretty easy to do. I have a hard time finding the fruit where I live now but I can find the guava paste easily in the Hispanic section of most supermarkets. It’s also easily found in the internet. I will post some links below.

Sometimes you will find the jam but I find it too soft for cakes. Even though you can still use the jam in a cake, I do prefer a thicker consistency which provides a less slippery cake. This is something important that you need to consider when you’re stacking a cake.

I always tell people that if they are using jams as fillings, they have to make sure not to overfill the cake and use a dam. Usually jams have a lot of flavor and a little goes a long way. If you want to have more filling, you can always add more layers to the cake instead of trying to pack a lot of filling the same layer and making everything slippery and hard to work with.

I love using guava paste. You can control how thick or thin you want the filling to be and fix the consistency at any time. You can do this with a food processor, in the stove or the microwave. I do get lazy sometimes and use the microwave, mostly because it works fast. But the other options work well too, especially if you don’t use microwaves or if you don’t own a food processor. I do go through all the steps in the tutorial I posted, (click here for tutorial).

I know some people love to add orange juice as the thinning agent. I personally don’t use it. I feel the guava tastes delicious without adding other flavors but if you like the idea, then go ahead and try it. Some people also like using lemon and others like adding some of the zest of the fruit they are using.

I posted a basic recipe in the website. Even if you prefer using the fruit, keep in mind that you can thin the recipe more if you prefer a thinner consistency just by adding some warm water. If you want a thick consistency, you can warm the paste and add it warm to the cake. This is a matter of preference and that’s why I am giving you the options so you can choose the one you prefer. Do keep in mind that if you plan to use it on top of an iced cake, if the paste is too warm, it will melt the buttercream.

Since I love a medium/thick texture on top of the buttercream, I do warm it a little but not too much. I also make sure that my buttercream is cold. I won’t lie, it’s a bit harder to ice a cake with the thicker paste over buttercream, especially if it’s too hot. So make sure it has a medium consistency so it’s easier to spread. If you already placed it on the cake and it’s giving you a hard time because it’s too thick, you can place the spatula in hot water. Once the spatula is hot, dry it with some paper and this will help smooth out the paste. If this doesn’t help you, then you can take some of the leftover paste recipe and thin it a bit with more water and then add it on top of the thicker paste. This will help you smooth everything out.

You can test all of these techniques but, if you prefer to avoid the trouble, adding the guava on top of the buttercream is just done for looks. You will get enough guava flavor by just adding it as a filling. Then again, people like me love guava that much. I never mind the extra guava flavor! Lol!!!

Check the tutorial for the Guava Filling Recipe. Click here or on the photo for the step by step tutorial.

I am posting below links for recipes you can use with this filling.
I hope you enjoy the tutorial and the recipe.
Until next Blog, ta ta!

Edna 🙂

This is the paste I used in the video.
Iberia Guava Paste


This is a delicious paste. I used it many times!
Goya Guava Paste


Guava Jam is a bit more runny but it can be used.
Guava Jam


Condensed Milk Buttercream it’s super easy.
Click here for recipe and Tutorial


Cream Cheese Buttercream goes great with this filling.
Click here to check this recipe and tutorial.


Moist White Cake Recipe

Moist White Cake Recipe pairs well with fruit fillings.
Click here to check this recipe tutorial.


For those who can eat eggs, this is a delicious cake!
Click here to check this recipe tutorial.


Learn to Ice a cake and also check many other
tutorials for basic cake techniques.
Click here.


Piped Shell Borders Tutorial.

Learn to pipe shells with this tutorial.

Flower Pot Topper

Flower Pot Tutorial

Years ago I was designing a cake for a bride and somehow we came to the conclusion that she wanted to have the topper fully as a dummy so she could save it and use it for her first year anniversary celebration cake. These days I mention this idea to all my brides just so that they know that this is an option available to them to do for their cakes. I love making toppers that I know will be saved and will keep the memory of that special event. It’s a great way to save something from the event and use it with a fresh cake if they want to.


The topper can be saved in a box or even under glass, if you want to save it from getting dusty so you can reuse it. If you prefer, you can display it in your house as long as you protect it from heat and light. The light will make the colors fade and the heat might soften the gumpaste details, so I prefer to keep it in a cold and dry area and away from sunlight or UV lights. With proper care a sugar piece should last for many years.

I still have a topper I made from a class I taught years ago and it’s still in great condition. Of course it won’t last forever, but if you lightly dust it, it should last for a very long time. Having the option of saving a topper is something that brides love. Especially when it comes to using gumpaste flowers. When they have the option of saving the item for a longer period, they feel better about investing on what is ultimately a work of art. I do make sure to tell them to be careful when moving the piece and cleaning it since gumpaste is delicate.

I made a tutorial on how I did the base of this cake. I wanted this base to look like a modern style basket weave, so I decided to use this beautiful mold from Marvelous Molds for my base. The tutorial shows how to use basic molds in unusual cake shapes. I basically divided my cake into panels and added other details to complete and clean the final design. I love the combination of the black and Copper Petal Dust for this fall theme topper.

Once you achieve your base, you can finish the topper with any flowers you want. You can do this type of base on real cake or on a dummy. I used a 6 inch dummy that had a V shape but I have also made this topper using a 4 inch dummy. This is another way to give height to a cake for a bride that is having a small wedding but wants a taller cake that makes a bolder statement.

I will post the links for the materials used in this cake below for those who are interested in them. Click to watch the tutorial.

I hope you enjoy this tutorial. Until next Blog, ta ta!
Edna 🙂


Here are the links for the products I used:
Tri Weave Simpress
Beautiful modern weave pattern made
by Marvelous Molds. They have so many
to choose from.


Image result for frames mold by celshapesFrame Mold
This is a frame mold from the Celcraft company.
They are called Celshapes. I have used this product for many
years and still love it.

This is a beautiful copper non toxic 
petal dust. I have this product available in my website.

You can also use other products like these ones:
Prima Marketing IOD Vintage Art Decor Moulding 1"Vintage Art Decor
The second line in this mold has a very close pattern
to the one I use from Celcraft. I think the other patterns
are really beautiful too.

This is a very useful too. If you don’t
have a specialty mold, you can always use this
to hide the seams or borders.

You can contact some companies to order dummies
with special shapes for your cakes.
Learn to make beautiful gumpaste flowers

with these easy to follow tutorials.


Cookies & Cream Cake Recipe

I love chocolate! And honestly, who doesn’t love to eat Oreo cookies? So whoever thought of putting them on cake deserves an award. In my last Blog I posted my favorite Chocolate Cake recipe so I decided to follow that with this delicious cake recipe.

I remember many years ago when I moved to Florida, I went to my local supermarket and they had a cookies & cream cake. At that time I was not into cake making but definitely into cake eating, so I had to try that cake. I must say that I thought it was delicious. The buttercream they used in that cake was like Bettercreme, (check my tutorial on this). They crushed the cookies into the Bettercreme and filled all the layers with this mixture, and then they covered the outside of the cake in the same icing/filling.

With time my cake taste has developed. As much as I liked that cake back then, I knew it could get even better. The recipe I used for the filling in this cake is super tasty. Instead of Bettercream, I used cream cheese and butter and it just takes the flavor to another level. I love the recipe how it is but if you want something lighter, you can always add a cup ofKRAFT COOL WHIP TOPPING 8 OZ PACK OF 3 to the recipe. Another option is to add a tub of Cool Whip or make your own stabilized whipped cream and add it to the recipe. Keep in mind that once you add the dairy into the mix you will need to keep the cake in the fridge. As many of you already know, I don’t like cold cake. I feel it loses flavor.

You can finish this cake with your favorite buttercream recipe. If you want something light, you can use Bettercream or Stabilized whipped cream. If you want delicious with a smooth finish, I suggest using my Cream Cheese Buttercream. This is a bakery style cake and is not about a perfect finish but it’s all about a delicious cake.

To finish this cake, I added Oreo cookies all around the bottom of the cake. This is a personal choice. But surely, who complains about eating more cookies..lol I do prefer using the thin Oreos when I am making the cake but you can use the regular ones just as well.

I topped the cake with some old fashion Ganache. I love Ganache and I know that it has dairy but it will keep well out of the fridge for a few days. Plus it makes it really creamy and delicious. If you can’t have dairy, you try making it with water instead. My other suggestion is using coconut milk.

For decorating the cake you can use anything. I decided to go all out and use Pocky Sticks flavored in cookies and cream, a bar of Hershey’s Cookies ‘n’ Cream and (are you ready for it?), more Oreos.


Click here to watch tutorial.

Here are the the links for the products and tutorials I used.

Chocolate Cake Recipe
Cookies & Cream Filling Recipe
Ganache for Drip Cakes
Bettercream Icing Tutorial
Stabilized Whipped Cream Tutorial
Pocky Stycks
Bettercream (product)
Hershey’s Cookies ‘n’ Cream Bar


Until next Blog, ta ta!
Edna 🙂

Moist Chocolate Cake- Easy Recipe

Last Blog I was talking about the difference between “Natural” and “Dutch Processed” cocoa. If you missed that post, I would suggest you read it because it can make a difference in the outcome of your chocolate cakes. In this Blog I will be talking about one of my favorite chocolate cake recipes.

When I first opened my website I had a Stout Chocolate recipe posted in there. I love that cake recipe. It’s a strong cake and almost tastes like a brownie. But not everyone wants to add beer to their cake and I can understand that. The alcohol in the recipe is baked away so there’s really no alcohol left in the cake but some people just don’t care to deal with it. Knowing this I have been meaning to post other chocolate recipes I love but between moving the website a couple of times and all the work I had, I just didn’t have enough time to sit and do a tutorial as I wanted. I can say that I finally took the time to do the tutorial and post it in the website. YAY!

This is a very old recipe but it has a few changes from the original recipe that in my opinion makes it taste even better. It makes a very moist cake and it’s super easy. The batter is a bit liquid and I am sure most people are not used to batters like that, but it works great. I use unflavored coconut oil for the recipe to make it healthier but you can use canola oil or vegetable oil instead if you prefer.

The recipe has never failed me but you can always decrease the baking soda by half a teaspoon if your cake sinks slightly in the center. Also keep in mind that depending on the cocoa you use the finished product could be different . I talked about this in my previous Blog.

I tried the recipe using Hershey’s Natural and Hershey’s Super Dark and I will say that I didn’t love the one with the Hershey’s Natural, but the one I made with Hershey’s Special Dark was really good. So if you are not in the mood to order high end cocoa for your cake, feel free to test it with the Hershey’s Special Dark. If you use your regular cocoa and it doesn’t turn out moist or with a a good crumb, make sure to try again but change your choice of cocoa this time. I assure you the cake is worth the try. I have used this recipe for many years with success.

Chocolate Buttercream Recipw

You can pair this chocolate cake recipe with my Chocolate Buttercream if you want a “death by chocolate” type of cake. I don’t use Hershey’s Special Dark for the buttercream because then it makes the chocolate flavor super strong so I tend to use a lighter flavor. I love Valhrona but you can use Ghirardelli or even Hershey’s Natural if you want to go with a super basic cocoa that you can find in any supermarket. I also love Droste but it’s harder to find. If you want higher end cocoa powders for your cakes, you might have to go to specialty stores or check in the internet for them. I will add that once you taste higher end cocoa powder it’s a bit difficult to go back to the supermarket because some of them are so good! lol

I will be working next on a tutorial for cookies and cream cake. So if you are an Oreo lover then you will love the next cake recipe post. But for now, click here for the link to the Chocolate Cake Recipe and Click here for the Chocolate Buttercream Recipe.

I hope you enjoy this Blog, until next one.. Ta ta!

Edna


Chocolate- Dutch VS Natural Cocoa for Baking

We all love chocolate and we each have our favorites when it comes to flavor.
I am a total chocaholic. Personally I would eat chocolate everyday if I could. lol

We all see recipes everywhere for cakes. And not everybody in the world is a chef and knows the difference between chocolates. Most of the time a regular person will see a recipe and go to the supermarket to buy the first cocoa they can find. Some people don’t even notice or think much about a recipe that is asking for dutch process or natural cocoa. All they see is unsweetened cocoa and that’s the one they will invariably go for.

I myself didn’t know much about the differences in chocolate until I started baking. There’s a world of information out there all about just chocolate. I’m no expert on just chocolate but I do know my basics on it and I will share one important fact.

When we see a recipe for a chocolate cake, the most important part it is the type of cocoa you should use in it. You will find mostly 2 types of cocoa powder. One is called “Natural” and the other one will be “Dutch Processed”. Even though these are the most common ones, there are other types or combos out there that you guys can explore. In the meantime I will explain the difference between these common two.


Chocolate Buttercream Recipw

Natural cocoa is solid, unsweetened chocolate that’s had most of its fat removed before being ground into powder. This cocoa powder is typically sold unsweetened, and although it may taste a bit bitter or harsh on its own, it can work well in baked goods that are meant specifically for this type of chocolate. This type of cocoa is consider to give a more drier outcome.

Dutch-process cocoa is natural cocoa that’s been treated with an alkalizing agent to lower its acidity. This allows more of its pure chocolate flavor to shine through. The alkali helps neutralize the natural acidity of the powder. The process gives the cocoa powder a more mellow, smooth and less bitter flavor. This type of cocoa tends to give a more fudgier, moist taste.

There’s a lot of science behind which one you can use when it comes to baking a cake. Natural Cocoa and Dutch cocoa are not interchangeable in all recipes. I will simplify by saying this: If a cake recipe only calls for baking soda, it likely uses acidic natural cocoa. If it only uses baking powder, it’ll probably ask for Dutch process cocoa instead. If a recipe calls for both, baking powder and baking soda, you’ll need to follow the recipe to get the proper balance of acid and alkaline. Recipes that use baking powder will likely rise anyways but not as well. So basically it’s best to stick to the cocoa that a recipe calls for. I personally tend to use dutch cocoa if the recipe doesn’t say which kind of chocolate to use.

Using the wrong cocoa in your recipe not only can make your cake go flat, but it can also make the flavor of your cake change drastically and you can end up with a cake with a strange or soapy taste. Keep in mind that some recipes have other acidic additions that come into play like buttermilk, fruits, sour cream, vinegars and other acids.

I would suggest that when you try a recipe for chocolate cake, make sure to see if there are any specifications for what type of chocolate you should use. If the cake is moist and you like the texture but you don’t like the flavor of it, then try another brand of cocoa. There are many brands out there and everyone has a different idea of what good chocolate should taste like. It’s a very personal opinion. Some people like a stronger flavor while others will prefer a subtle one. Some people like milk chocolate and others like dark and bittersweet. It’s all out there for grabs!

There are many options when it comes to chocolate. Check for Black Cocoa, Double Cocoa, Triple Cocoa and others. Some are made with a combination of natural and dutch process chocolates, others are known as heavily-dutch and have a stronger chocolate flavor. Believe me, I could go on until my last name changes to Hershey, but then this blog would be very long. At least you get an idea of what is out there and do more research on the subject. Keep in mind also that cocoa powders have different flavors and some of them contain more fats or starches and this will give you either a more moist cake or drier cake. All of these things are important if you are still trying to find your perfect cacao for your cakes.

The whole point behind this blog is to let you guys know that if you have tested a recipe for a chocolate cake and maybe the crumb of the cake was great or it was perfectly moist, but the flavor was a little off, then maybe you need to change your cocoa and test it again. If you are not happy with the crumb of the cake but the recipe has great reviews, maybe you need to try another cocoa. The wrong cocoa can change the crumb and moisture of a cake.

Valrhona Pure Cocoa Powder, 8.8 oz.Some of the most well known companies are Vahlrona, Callebaut, Guittard and there are others. Hershey’s and Ghirardelli are the most easily found in supermarkets. In a pinch I have used Hershey’s Special Dark (this one combines natural and dutch chocolate in it). Keep in mind that the other Hershey’s sold is natural cacao so if you have used it in a cake recipe that calls for dutch cacao, then the outcome might not has been the expected one. On the least expensive ones, the Hershey’s Special Dark has a dark (duh) color and pretty decent flavor and I like it a lot better than the original one at least on the cake recipes I have used it in. I will add that I have used the Hershey’s Natural Original and liked the taste better than the Hershey’s Special for the chocolate buttercream recipe I have in my website. Like I said, testing will be your best friend until you find your favorite one.

If you happen to be a chocolate snob, then go for the higher quality one. Keep in mind that most of the times you might have to order those online and they have a higher price. For those who are chocolate lovers, sometimes the flavor is worth the extras. My job is not to sell you a specific product but to let you know that there are options. Experiment! I was sent by a super awesome lady overseas, a cocoa call Droste and it was super delicious. Worth checking it out!Droste (4 pack) Cocoa from Holland

I will add that if you get one cocoa that didn’t work for a recipe, this doesn’t mean it’s a bad one. It might just not be the right recipe for that specific cocoa. Test it with other recipes to see how flavor changes and what works best for your tastebuds. Some companies might even have recipes that work well with their own products and that might be worth a try.

We all grew up with what we think good chocolate should taste like. From country to country, or even state to state, you will find there’s a huge difference on what people prefer. At the end of the day it’s your own personal search. Hope you find your favorite cocoa. To paraphrase Agent Mulder from the X Files, “the cocoa truth is out there!”

I hope you enjoy this Blog, until next one.. ta ta!

Edna


The Quilted Cake Design

I posted a new cake tutorial for a cake design I made. I love to get creative sometimes and do cakes that are amazing but the truth is that most clients either can’t afford them or they just want something simple. And to be quite honest, simple cakes that are fast can sometimes make more money than all those super busy complicated cakes that take a lot more time to make. For as much as I love to get fancy, simple designs are heaven on a busy week.

Quilted cakes have been in style for many years. I have made so many of them with different patterns and I can say that to this day, brides still love them. They are simply classic and elegant.

I got this new mold from Marvelous Molds and I love the design. In the video I did the cake without using dragees and the cake looks amazing. The really cool thing about this mold is that you can actually place the dragees on the mold before placing the fondant.

Gold Dragees

I won’t lie, I was a bit worried about doing this. All I thought was that the dragees were gonna be rolling everywhere and they where not gonna stick to the fondant.

I placed each little ball on each hole and then I placed the fondant on top.

I used no glue at all, and to my amazement, all the dragees stayed in place. You know how many dragees I had to place in cakes, one by one with pliers or tweezers over the course of almost 22 years???? All I can say is that I was super impressed and I love the fact that this mold can be used with or without the dragees.

Since this was a square cake, I wanted to finish the borders with some gold details. I decided to use the Vibrance Brooch Mold. I wanted to cover the edges and this mold is the perfect height for this purpose. To finish it I painted it in Gold Highlighter. I also cut this mold and added pieces of it to the board to give it a finished look that made everything cohesive.

Vibrance Brooch Mold

Most of the time I like to finish my cakes with whatever color of flowers I have to use and then I combine them with filler flowers in other colors. But for this cake, the red roses made a beautiful statement. No filler flowers used unless it was smaller roses, buds or leaves. I have a tutorial on how to make roses with circle cutters that I made so many years ago and it’s still a great way to get started if you want to play with gumpaste roses and you all you have are circle cutters. I also have a DVD with 4 hours worth of roses that include different ways to make them; how to make leaves, buds, how to color them and even how to make thorns.


Marvelous Molds is giving away 3 of their new molds and the rules are these ones; Go to Instagram and follow Marvelous Molds and Design_Me _a_Cake. Marvelous Molds is choosing a winner that does all the steps above so make sure you do that and I will post the winner as soon as I find out. You can also get an extra entry if you tag a friend.

I love how the cake turned out and I know brides love this type of cake. Below I am posting the links for the tutorials or products I used to make this cake. Click on the photo for more info. Click here or on the photo below to go watch tutorial.


I hope you enjoy the tutorial.
Until next Blog, ta ta!

Edna 🙂