Fixing a Broken Gumpaste Flower

I know I’ve haven’t written a Blog for awhile and I need to write a few of them for videos I have posted in You Tube, so here I am trying to catch up.

One of the videos I posted earlier was about doing a simple fix on a broken gumpaste flower. I remember years ago I was working at a custom cake store and one flower broke. I was about to throw it away and my good friend Maria told me not to. She said we can use it in the back of the cake and hide the broken part. So I adopted that way of thinking.
For cake shows and competitions this is not something I would suggest doing since judges do thoroughly inspect the arrangements to make sure that all of the flowers are done perfectly. But when you are dealing with weddings, some things are more forgivable and hiding a broken flower by using it as a filler works great, as long as you place it in such a way that the broken piece won’t show .

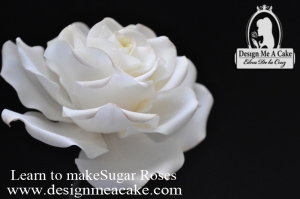
On a cake I was working on, the flower that broke was one of my favorites. Yes, I do have flowers that turn out better than others and I prefer using them for the front of the cake. A petal from the flower broke off and it was a clean break. When you get a clean break at the base of the petal, it’s a bit easier to fix and can be easier to hide. When done well, no one will notice the break. I do make sure to place the broken area in such a way that it’s less visible.
I remember when I was just starting to decorate cakes, there was a cake decorator who told me he used crazy glue to fix broken flowers. I just don’t feel comfortable using it near anything that goes in my cake. I know that gumpaste flowers are really not for eating but I still have my reservations.

I prefer to soften a small amount of gumpaste with some gum glue (click here for gum glue tutorial), and place it in the broken edge and let it dry. This usually works great but you have to let it dry well before you can use the flower. So if I am in a hurry and I can’t wait, I use a small piece of super thin gumpaste and add it with gum glue. Sometimes putting this super thin layer on one side will give you a strong bond but if you want an even stronger bond, I recommend that you do this on both sides of the petal.

Watch the video tutorial to see how I do it. I hope it helps when one of your flowers gets broken while you’re working on a cake.

Hope you enjoy this tutorial and soon I will post a Blog on the cake I design with them.
Until next Blog, ta ta!

Edna 😉

Advertisement

Rosette Cake Design

I just got 2 new molds and I asked on Instagram which one you guys would prefer to see in a tutorial. I should have known that most of you would say both. LOL. I’ve decided to do both but I started with the rose mold first.

The Rosette Mold comes from a very popular design that creates beautiful roses by using stripes of fondant that are ruffled, and then placed strategically on the cake forming roses. This technique reminds me of the lace fabric I used to work with years ago when I designed clothing. Even though the design is so beautiful, you can expect long amounts of hours working on this design. It’s very time consuming.

I always love anything that shortens the length of work time when I am working on a cake. Not only can the customer save some money but I save time and earn more money too, so for me this is a win win. Now I can give the customer an option and if they want the original design, then they know they have to pay more for the work it involves, or just simply save some money and labor by using this shortcut.

I decided to see how the mold looks in a 2 tier cake and this is the finish product. Rosette Cake Design

I finished the cake with some of my favorite flowers gumpaste Orchids and Roses with some filler flowers and tropical leaves. I have a tutorial on Orchids posted in the website already but soon I will be adding a section with advanced tutorials that you can access anytime and will include more flowers, plus I plan to add more tutorials to it.Gumpaste flower arrangement.

And here is a close up of the pattern for the Rosette Mold.

Easy Rosette Cake Design

I will do another tutorial as soon as I can using the other mold I got. In the meantime I hope you enjoy this tutorial. I am posting the links to the products below for those of you who ask.

You can click here to watch the tutorial!

You can see it in You tube if you prefer. Here’s the link. Don’t forget to Subscribe to my channel!

Until next time.. ta ta!
Edna 🙂


Click here for more info on this beautiful mold.

The Knitted Cake – Product Review

I love to knit and crochet and I just got beautiful molds that are just perfect to create a cake that looks like you have knitted a sweater for it. With fall coming, tons of ideas roll in my head on how I can use these molds!

I love molds and I understand that some people don’t like to spend the money on molds because they might be able to do a design without one. For a person that don’t do cakes often and has the time to spend tons of hours on a cake, saving the money seems fair but for those who have many cakes to do in a day, the right mold can make you move faster, so you don’t have to spend so much time making just one cake.

A cake that looks like it has been knitted is one of those designs that can take a lot of time and effort if you do them without a mold. You would have to use an extruder and take 2 strands, twisting them together and then placing it on the cake, one line at a time, so you can cover a whole cake. It will look beautiful, but the hours spent doing that is not something I look forward too. I love making cakes, but I love to enjoy my life too.

Another way to do a knitted look it is by creating your own mold. It’s a fun thing to play with and create your own molds. But let’s face it, getting the materials for this can get expensive and you need to keep in mind that you need to treat the thread so it can be molded properly (Basically you have to buy a product to spray on the knit so it don’t stick to the mold). It can be time-consuming and not necessarily cheaper option, but if you like to play with making your own molds it can be a fun craft.

I like to use many techniques in my cakes. I will never say no to something that will save me time just because someone in the world might think is better to do things this way or that way. If I can make it fast with a mold I will. I also have learned to use the same mold for different purposes to create versatility on the cake by cutting the molds or simply manipulate the pattern to create another design with the same mold. I see them as an investment that will save me time so I don’t have to spend days making a cake that won’t pay me for all that time I spent making it. I say this all the time and I will say it again: “Time is Money” and my free time means I can relax and enjoy life. Something I value very much.

Sometimes I get molds because I use them over and over in my designs. Sometimes I get them because the mold has a unique pattern and sometimes I get them just because they are gorgeous. Whatever the reason I get them for my pleasure and my customers cakes.

You can say it’s one of those addictive habits that I won’t give up easily…lol. Just like my stash of fabrics in my sewing room. I love that it’s there and I can use it at any time I want especially for those last minute outfits you want to create.

For this video I used the Braided Knit Border and the Classic Knit. I think all of them can be used by themselves and make beautiful cakes, but I really wanted to combine them for this cake tutorial.

I also added a brooch detail  using a mold call Devonaire Brooch and Medium Leather buttons just to finish the look. I painted them in Silver highlighter to brighten the whole cake and the Gumpaste Flowers just soften the whole look. These I teach in my DVD’s.

Marvelous Molds is a great company and constantly creates new and innovated molds that I have yet to encounter to be poorly made. I have used their products since they started making their fabulous molds and they haven’t failed me yet. So my review for this knitted mold in particular is 5 STARS!!! I have worked with many molds throughout the years and a mold with a good design and impression quality of the silicone is very important. I have tested some of the products that are coming from China that are being copied from good companies, but the silicone impressions don’t have the same quality, complete disappointment. It can be a hit or miss with them so I stay with the companies I trust to avoid losing out on money, and save myself from the torture. I have to do a tutorial-review on those products coming from there.

I love the finish look of this cake and I’m so excited to use these molds! Not only for my fall and christmas cakes, but for baby cakes also. Feel free to leave me comments below for products that you want me to review. If it’s accessible to me I can try to add it to my list. Click here to watch the tutorial or click on the photo below.

Until next time, Ta Ta!!!

Edna


*The small earnings from advertisements in this Blog are used towards making more tutorials. Reviews are 100% honest and I stand by them. 

Simpress Molds- Tutorial and Review

I had to make a cake a couple of weeks ago and I decided to use this new product from Marvelous Molds called Simpress.

I love anything that makes my work fast, pretty and easy. This product it’s pretty cool. It covers the cake fast with a beautiful design and it’s pretty easy to use. It comes in 3 different designs at the moment and I am hoping they come with new styles soon!

You can place this over buttercream or fondant and it joins really well at the seams. It measures 4 inches tall, so it covers your standard cake but you can stack each piece if you need it for taller cakes.

I used a dummy for this tutorial and I showed how you can apply the mold in 2 different ways. Since it was a dummy, it was covered in fondant, but the cake above was made in buttercream and it worked just as well. I do advice to place the cake in the fridge and let the buttercream harden up before you place the mold over it.


As you can see, the side edge of the mold it’s not even. This is so you can place the next mold side-by-side and align the pattern creating a continuous flow which eliminates joint lines. In the video I used the Jubilee Sequin Mold and I’m totally loving it.

In the tutorial, I show you a way to finish the back of the cake where the mold doesn’t meet. All cakes have a back side; I just tend to finish it in a straight line for those times the molds don’t meet at the back. Also, you can always add buttons, use an extruder machine to create a delicate rope or even cover it with single sequins if you want to hide it.

I finished the top edge with a line of cutout circles that I made with a piping tip #12. Then I made a hole with a needle. I did add a bit of Tylose to the fondant so I could move faster since the Tylose hardens the fondant and makes it easier to cut.


These patterns come alive with some luster dust, so feel free to paint them with your favorite colors. To make this easy, I tend to have the base color as close as I can to the color for the luster dust I am using.I love how this cake turned out. Click here to watch the tutorial I made for this tool.

Click here to go watch video.

I hope you enjoy the blog and tutorial.
Until next time, Ta ta!
Edna 😀


Here are some of the other tools I used for this cake.
Click here for the top border cutter painted in gold.
Click here for Gold highlighter.
Click here for Luster Dust.
Click here for Pearl border mold.
Click here for Edible Images from Icing Images.
Click here for Marvelous Molds or click on the photos below.

Symmetrical Sequin Simpress


Pretty in Pearls Simpress


Sequin Jubilee


*There are links posted in this Blog that I will earn a very small percentage of their sales. I only promote products I love and believe in, and products I use. The commission earned will be used towards new tutorials.


Fantasy Gumpaste Flower

Cupcake Fantasy Flower in gumpaste.

Para Blog en Español presione aquí.

I was surfing the net awhile ago and saw a beautiful cupcake made by
The Pastry Studio. I contacted them to use their cupcake as inspiration for
a tutorial and they said yes!

This is the photo that I found. I love how they mix the Cupcake Fantasy Flower in gumpaste.
pearls and nonpareils. Makes it look really delicate
and elegant.

I don’t know the steps they used in making these
cupcakes, so I will show you how I would make
them. I didn’t have different sizes of pearls so
I used nonpareils, sugar pearls and sugar
crystals. But I do love the bigger pearls they
used in their cupcakes.

For this particular flower you will need 2 five petal cutters. I used the 2 biggest ones on this PME 5 Petal CutterSet.

The flower is not difficult to make. If you are not used to making gumpaste flowers, this is a great way to learn.

When I make cakes, I know I need to move
fast. Spending too much time in a single detail is not a great idea when you are trying to earn some money. This is something I keep in mind when I teach. We want pretty and we want fast.
This is the reason why I mention the tools
I use that help me to move fast when I do tutorials.
Celformers, flower formers.
I used a Celformer to shape this flower. This is one of those tools that I love and make my flower making a bit easier. I cover them in foil so I can reuse the former as I dry the flowers I already made.

The tutorial is very detailed. You can also
add more detail to the flower with petal dust
if you want to take it to another level. I didn’t
do the petal dust in the tutorial because I wanted to show the simplified version of the flower.

Some people will say this is a lot of work for a cupcake and yes it can be. So make sure to charge well for the work you do. The other option will be to mix this cupcake with others that have a more simple design. The flower can also be used in cakes.

No matter how you end up using it, this is a great flower to learn. I hope you
enjoy the Tutorial. Click on the photo to go watch full Tutorial.

Cupcake Fantasy Flower in gumpaste.

Until next blog, ta ta!

Edna 😉


Celebration Cupcakes- Tutorial

Celebration Cupcake=4th of July

Presione aqui para Español

I did this cupcake for the 4th of July and decided to film it while I was working
on it, (click here to watch the video). I love the design on this cupcake. I know many people will say, “that’s too much work for a cupcake”. Yeah, it has some work, and it would be a lot of work if you want to do all your cupcakes with the same design. The beauty about making cupcakes is that you can make them all in different designs. By doing some simple ones, your most complicated ones will shine and make a statement.
Roses, stripes and Stars cupcake. 4th of July CelebrationHere is the cupcake! I used the Strip Cutter to makes the stripes. An easy way to make perfect stripes fast.

Strip Cutter #1 2

I love JEM Cutters. They have a series of cutters that can be place in  a foam they created so you can cut your pieces upside down. I love using the cutters this way because you can make sure that the cut is clean.

Here to the right is the cutter I used. You  can click on the photo for more info on that tool.

JEM Roller foam

To the left is the Roller Foam. As you can see it works with a lot of the delicate cutters from this company.  Click on the photo for more info. I added to the cupcake some stars.  As many of you might already know, I love plunger cutters. I move fast when I used them and that’s important when making cakes.Gold highlighter


I painted the stars using my favorite gold highlighter.I did a few months ago a video that teaches how to use the Gold highlighter. You can click here to check the tutorial.

Miniature gumpaste rose.

I took this photo while I was doing the roses. Miniature roses are fun to make. But it’s important to be able to move fast when doing them. You really don’t want to spend hours making a little tiny flower. I have 2 ways of doing these roses and in the video I just used no cutters. I will do and advanced tutorial on these flowers for those who want to learn to make them.

Celebration Cupcake Tutorial

Click on the photo to go see the tutorial.

I hope you enjoy the video!
Until next time, ta ta!
Edna 😉

Cake Fun Contest- Week 2

Week 1 was a success. Here are the winners chosen by you guys.

Alis Nonoleta Nuta was the winner for the beginners cake, and Beverly Call Brown was the winner for the more advanced cakes. These 2 cakes were part of our first weeks competition.

Alis Nonoleta Nuta

Alis Nonoleta Nuta

Beverly Call Brown

Beverly Call Brown


We now begin voting for the 2nd week of this contest. Scroll down to choose your favorite beginner and advanced cake. Leave a comment below with your favorites for each division.

Here are the names and the cakes chosen for Advanced cakes:

Christine Jelloian

Christine Jelloian

Leyla Sanabria-Perez

Leyla Sanabria-Perez

Michelle Head

Michelle Head


Here are the names and the cakes chosen for Beginners cakes:

Debbie Shaw

Debbie Shaw

Jessica M. Dorman‎

Jessica M. Dorman‎

Judy Stebbings

Judy Stebbings

Remember to choose one cake for the advanced level, and one for the beginners level. Post the names of your favorite cakes in the comments below. I will announce the winners next week.

In the meantime, don’t forget to post your cakes with the BEGINNERS or ADVANCED LABELS on them so I can place your cake in the right division. Post them on the thread that is pinned at the top of my page by clicking here: Facebook Page Design Me a Cake.

Remember you can be a winner! The final prize will be a cake toy for each division from my web Store www.designmeacake.biz. Go check out all the goodies!!

I will ask of you guys to not spam the contest with fake votes or business promotions; this is a contest that is for fun. Remember to vote only once, and to list the names of each contestant for each division. Just have fun with it.

Remember, October 6th is the last date to submit your cakes for the final drawing. So if you didn’t win this week, keep posting your cakes with your title of beginners or advanced level. Good luck to everyone!

Until next time, Ta ta!
Edna 🙂

A New Start

Sugar Rose

I have been using the Blog included in my website for a long time.
But my server changed owners and they have decided to not update my services. The most amazing part is that I am still a paying customer but seems easy to not tell customers that they have decided to forget you instead of helping you do a smooth transition to the new services. I found out because my website was moving so slow and not working as it used to do.

Not being happy with this situation I have decided to try another blog. I am right now working in a new website for my company, Design Me a Cake. I will be moving all my tutorials, photos, recipes and everything I have in the old website.

I didn’t build my website in one day. It took years to build. I open a website to help my students learn and it grew more than I’ve have ever expected.

My dream is to continue to make the website bigger and add more information, more designs and even advanced tutorials so that everybody have easy access to them. I have my DVD’s but people in other countries have a hard time with the shipping charges and I totally understand why. I just found out yesterday that Global Priority went up for around 5 dollars more. It’s a bit hard for me to see this. But I am trying to work around this.

The photo of the flower I just posted its a Gumpaste Rose.. I will talk more about it in my next post.

I have a lot of work ahead of me. Hopefully things will move fast.
All I can do is keep working and hope for the best.
It’s a New Year with a New Start…

Sugar Hugs, and until next blog… Ta ta!
Edna 🙂