Every year I do a Christmas cake. It’s a tradition I keep and enjoy. I used to make decorated cookies. But for the past few years I decided to make a cake instead of the cookies. I miss doing the cookies but time will just not allow me to do both.
I decided to do a blog to answer the questions that people ask me when I post a
cake. All the green letters are links to the products.
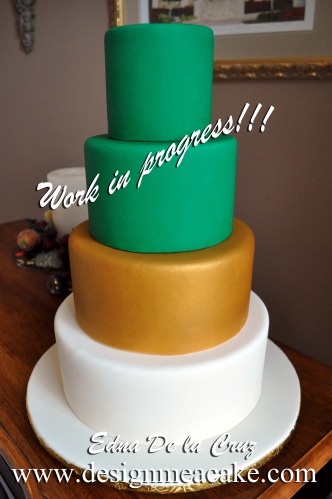
Here is the naked cake.
I wanted a Christmas style cake so I definitively wanted green in it.
The fondant I used for the green came from Renshaw. Most of you might
not have heard of them. They are a British company that over 100 years
experience in baking and cake decorating.
I was completely pleased with
this fondant. Often times dark
colors in other brands of fondant
tend to crack, but Renshaw did not crack, the flavor was good and
it was easy to work with.
For the bottom 2 tiers, I used my homemade white fondant. I will post that as soon as I can do a video tutorial on how to make it.
I used Luck’s Classic Gold Shimmer with my Airbru sh to color the cake. I love to airbrush a cake but one thing you need to know is that airbrushing will make any small crack look more like a crater. Especially if you try to airbrushed too fast and make the fondant too wet.When it
is too wet it will begin to dissolve the fondant.
I suggest you give it a coat of color and let it dry in between coats to get a better finish. In between drying sessions I keep working with other details of the cake. This way I move faster.
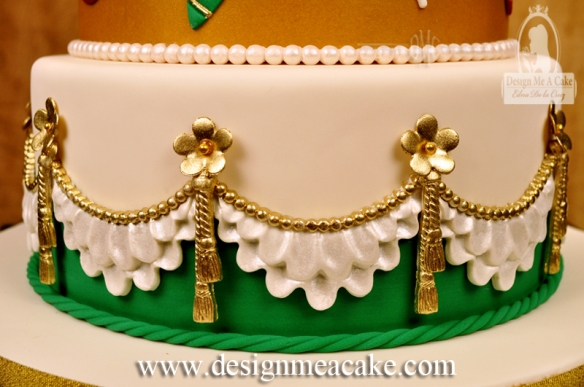
For the bottom tier, I did a band in green. and I cut the top part of the band in the same swag shape I was using on top of it.
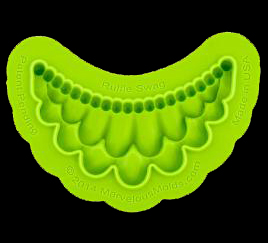
 This is the mold I used called,
“The Ruffle Swag”. It’s from the company Marvelous Molds. The mold has two layers of ruffles and is topped with a string of pearls.
I decided to paint those pearls with a
Gold Highlighter. (click here for gold). This gold is meant only for decorations that can be taken
down before cutting the cake.
There are lots of highlighter golds out there but none of them are edible. I have seen some companies say it’s approved, but the reality is that none of them are approved. There are other golden tones that are non-toxic but they don’t have the true gold color that the highlighter gives. If you need a true gold for a full cake,
then you can either use edible gold leaf or buy 24 carat luster gold.
This option is a bit more pricey, so I stick with airbrushing.
In between the ruffles I added this mold. This one is called, “Grand Tassel Drop Mold”. This one I finished with the highlighter Gold as well.
At the top of each tassel, I added a simple Blossom like the ones I made in my tutorial, “How to make Simple Blossoms”.
Watch the video above to learn how to make Simple Blossoms.
Click here for the Plunger Cutters.
Click here for the Flower Former.
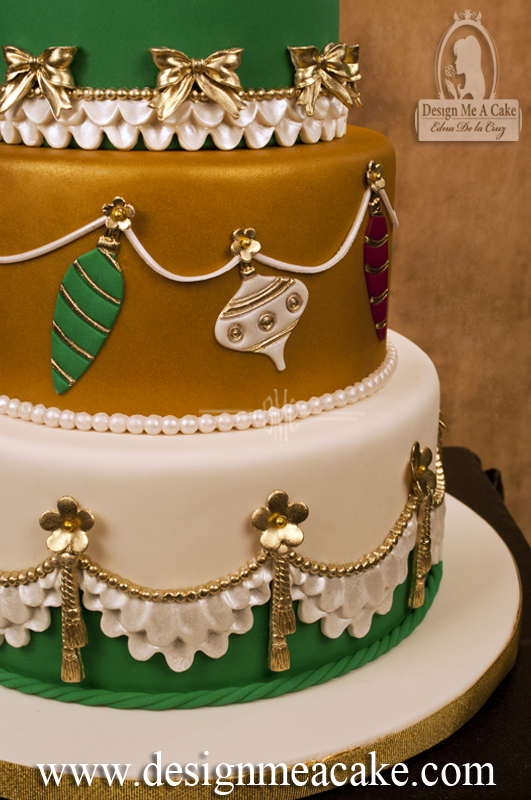
On the tier above I used the “Ruffle Border”. 
This mold has the same ruffle detail as the swag but it’s on a straight line. The molds connect easily so you can connect them and make them look
like a one big piece. I painted the ruffle part on both the swag and this
one with Super Pearl Luster Dust.
 Once again, on this ruffle border I painted the pearls
with the Gold Highlighter and then
I added Molded bows
Some people may wonder why I used a mold when I can do bows so easily without the mold. Well, the reason is simple. It’s just a different look and it can be a fast approach too. But basically for me it’s just part of the look I wanted
for the cake.
For the tier that I airbrushed, I added cutouts that look like ornaments.
I don’t have this available at the web store at the moment but if you are
interested in them, feel free to leave me a comment below so I can order some.
They are really easy to work with and I hand painted them with Gold Highlighter.
For this tier, I used the Perfect Pearl Mold
to finish the base. I wanted to bring some of
the white, green and gold to it. This way I
have a color flow between all the tiers.
In the first and last tier, I used an Extruder
to finish the border. I kept those borders
green because I wanted them to blend
with the background.
For the topper I used a Poinsettia. I teach how to make these flowers in my DVD, How to Make Gumpaste Poinsettia”. In the DVD I explain how to make fantasy Poinsettia like this one. I added some gumpaste snowflakes, finished with some disco dust and a cutout Christmas tree dusted in Gold Highlighter.
The Christmas tree cutter is made by Ximena (click here for cutter).
On another note, I added a Newsletter button at the top of the blog for those
who want to receive an e-mail newsletter. I don’t like my email to be filled with
daily newsletters and I don’t plan to do that to you guys either. But I can send
news for a new tutorial posted, or a special sale at the store or even a contest.
Plus I plan to do more advanced tutorials too.
I would love for you to share any ideas you may have with me. Do you
guys like basic details on how a cake was done, or do you want
full step by step tutorials? I ask this because I can do basic tutorials
but the ones that are step by step are more time consuming and I
might have to charge a small fee for those. Do you prefer PDF
files or video tutorials?
Any ideas that you have will be great for you to share with me.I want
to do either A video or blog, where I answer questions you have.
So any ideas you have, comments and questions, feel free to
post here or go to my Page in Facebook and post them there.
You are my cake family and I have always tried to help in areas that you
need help. Hopefully with the new year I can finally finish the new website
and not have to stress about it anymore. I want to dedicate more time to
what I truly love, making cakes and teaching. Hope you guys help me with
all this work I have! lol
And don’t worry about misplacing recipes. The new website will have all the
recipes I have and I will add more to the list. Maybe some of the links
will change but all will be there. Even cakes I never posted from my earlier
years.I will leave my old cakes so you can see how much I have
grown through the years. I want people to know that to achieve better
cakes you need time and practice. Giving up is not an option.
Hope you had a wonderful New Year and wish you the best ahead.
Lots of hugs from my house to yours. Thanks for being my cake family!
Until next blog, ta ta!
Edna 🙂


Thank you for the wonderful step by step!! It is so kind of you to share!! xo ❤ HNY!
You welcome!
as usual – I love your work! would love to receive your newsletter
Look for the green button at the top of the blog! Thanks!!
Thanks for the awesome informative post!!! You are such an inspiration to me. In fact, I even used your edible paper technique on a cake I baked for a wedding. I am learning as I go and appreciate all the tips!!!
Thanks! We will keep trying 🙂
Thank you for the detail and links for making this masterpiece! You are such a giving person to share this with us! Many many thanks!
You welcome!
You are my inspiration 🙂 your cakes are just as lovely as you are.
Meena Mustafa
Thank you Meena!
Wow, what luck to find your blog! Thank you for all your tips and links, how generous of you 🙂
I haven’t used many metallics before, I’m hoping you can please answer 2 questions about this cake for me? Firstly, did you airbrush the gold tier separately? (Ie is it OK to touch to assemble after airbrushed or do you do it in position and try covering the other tiers?!) And also, when you painted the gold pearls, could you then handle them to position them or did you paint them when already in position. Sorry for the wordy queries! And many many thanks 🙂
I usually airbrush separate unless the whole cake is the same color. If you need to retouch somewhere while is stack, then you can cover. the area. The gold pearls I painted them separate and the place them on the cake. You can use lemon extract or Everclear alcohol. The higher the amount of alcohol, the fastest it will dry.
Thank you so much for taking the time to reply 🙂
Awesome. You are such a wonderful and a giving person. God bless you for this. Thank you for all the openness and simplicity.
Please I’ll like to be receiving your news letter.
Thank you.
Yemisi
Thank you!!!